Thursday 10 November 2016

London Getaway


Ross and I booked tickets to Jurassic Park in Concert waaaaayyy back in early spring when they were first released, and planned a short break to London thinking it would be this years holiday for us. We were very fortunate this year and Ross started a great new job and so we were actually able to fulfil our dream of visiting Barcelona over our wedding anniversary in August, but it was great to have a little winter break planned to look forward to too!

The concert was incredible, it was packed and all people around our age who were just as excited as we were to see this childhood favourite brought to life by the Royal Philharmonic Orchestra. It was an emotional experience!


You know I love baking, and you know I love instagram, and so I planned to visit some of my favourite bakeries, patisseries and food places while we were in London, and we managed to get to most of them!

I had a very detailed (but not strict) itinerary made up in excel (I know... I'm a loser) to make sure we could fit in all the places we wanted to go, leave ourselves time to enjoy and not get lost! Of course it didn't work haha. We ended up rushing about, walking the feet off ourselves and being generally simultaneously stuffed and exhausted from exercise! 

But we managed to visit;

Shops


Liberty - for everything patterned and beautiful - wait til you see the hanky I bought!


Broadway Market - for the Meringue Girls stand! (more below)

Mac in Heathrow Term. 5 - Twig for less than £12? YES PLEASE!

The gorgeous Christmas decorations on the main Fortnum Staircase
My new Liberty hanky!
Look at all those bits and bobs! I love it!!
Books in Portobello Road Market
We stumbled across The House of MinaLima by accident, when we were looking for Barrafina on Thursday night, and I'm so glad we did! A wonky, bright, fascinating place tucked away on Greek Street, filled with incredible artwork and Harry Potter paraphernalia. It's only open until February, so check it out if you get a chance!!


Renegade Craft Fair, The Old Truman Brewery, Brick lane - to meet the lovely Ella Masters and have our portrait painted! - I wish I'd planned more time here, it looked like a great fair with loads of amazing artists!


Food & Drinks


Selfridges food hall - for Angés du Sucre, Meringue Girls and more

Sketch - for a look about, but we didn't book a table and didn't fancy a cocktail - slightly regretting that now! I'd read online that you could just drop in for a cocktail or coffee in the Gallery but apparently its bookings only! #gutted

Barrafina - We visited the Frith Street Barrafina on Thursday evening, and from reviews, we knew we would have to wait for a seat, as it's a first come - first served tapas place. We waited for over an hour, but there was a bar along the wall and the waiting staff were lovely and we were able to order drinks and olives while we waited. Plus it built up our appetite!
I have to say, the food way totally worth the wait. We ordered several dishes to share and a couple for ourselves, the one which I loved the most was the Jamon And Spinach Tortilla - this is honestly one of the tastiest things I've ever eaten! I would definitely recommend a visit to Barrafina!


Zebrano Soho - Happy Hour! I looked up the best happy hours/ cocktail offers in Soho before we went, and Zebrano was top of the list. They have half price cocktails Monday - Wednesday 5pm -10pm
Thursday - Saturday 5pm - 9pm, and bear in mind that for London, the cocktails are already fairly priced! We ended up having quite a few!! See the menu for yourself here, we tried and would recommend; The Kiwi Cooler, Lynchburg honey, Jaffa cake martini, Lychee martini. Great drinks, good atmosphere and really lovely staff!


Granger & Co. - OMG guys, if you get the chance, and can be bothered queuing, get to granger & 
Co! I had googled 'Best brunch near portobello' and Granger & Co. Notting Hill featured highly on many lists and for good reason. Timeout also mentioned how popular it is with Notting Hill natives and to expect to wait for a table, so when we walked up the road to see a long queue of gorgeously dressed people with enviable bone structure outside a canopied building, I knew we'd arrived!

I had the Poached Eggs and Sourdough with added avocado and rose harissa - which was delish, Ross had the Ricotta Hotcakes with Honeycomb Butter which was DELISH! (no pics- he ate them to quickly!)
10/10 would recommend - just take a brolly and comfy shoes!


Maître Choux - I'd followed Maitre Choux on instagram for quite some time and drooled over the pictures of their sparkly, sumptuous eclairs. As it seemed within walking distance of The Royal Albert hall (if you don't mind walking!) we decided to head there before the show on friday after an early dinner. It was nice. Yep, nice. I wasn't mind blown by the experience, the shop/cafe only had two small tables and the counters were empty (although they didn't close until 8pm, some time later) and the eclairs were much smaller than I expected. We paid £17 for two eclairs and an americano and I savoured every morsel. Tasty but perhaps more beautiful to look at through the window than to actually experience! Maybe I'd built them up too much in my mind!!


Meringue Girls stand Broadway Market - This was something I'd looked forward to for a long time and after frantically running up and down all the market stalls looking for the signature WOW of the rainbow kisses and not seeing it, i called the number on the Meringue Girls site and Alex (possibly the Alex Meringue Girl??!) gave us directions.

We found it and it was b-e-a-utiful. I bought a mixed box of 9 for us and a box for Ella Masters.


Exploring


Ross and I have both spent a fair bit of time in London for both work and leisure before, and we've visited most popular areas, Portobello, Camden, oxfor Street etc but neithe of us had been to brick lane before, or Hackney and this happened to be where Ella masters and the Meringue Girls stand were on the Saturday we were there, so suitcases in hand we went exploring!

I love street art generally, and always try to snap pictures of pieces I really like because of course, who knows how long it will be there for!

Below are some snapshots from around Bricklane, Portobello Road and Notting Hill, and a few colourful snaps of other things that caught my eye!


Where are your favourite London spots? Let me know any suggestions you have for our next trip!

Love,
Lindzi x

Thursday 27 October 2016

DIY Halloween Decor - Faux Insect Taxidermy Plaques

If you know me, you know I love bugs. Entomology fascinates me, I have a few pieces of antique and vintage insect taxidermy and quite a lot of insect themed homeware! I also spent several hours this past summer studying pictures of interesting beetles and painting them in watercolour, which I found so soothing and I love my mini canvas now!

Annnnway, if you know me you'll also know I LOVE Halloween, I mean, I love ll seasons and events, but Halloween is GREAT! and I've gone all out this year with nice, somewhat grown-up Halloween decorations that I will hopefully keep and reuse for years (vs the normal poundshop/ dollarstore tacky stuff - which I also love!)

One of the things I made this year were these faux insect taxidermy plaques, which are seriously simple to make and I think look so cool!


Here's what you'll need;


  • Wooden plaques in your chosen size - I used these which I got on eBay (I chose 3 diff shapes)
  • Black/ dark gray chalk paint - I used one I had which has great coverage and dries quickly
  • Plastic insects in your chosen size - again I got these on eBay
  • Gold spray paint - I used this Rustoleum one because i'd bought it for another project, but cheap spray paint will work as well!
  • All purpose glue or glue dots
  • String/ ribbon (depending on the plaques you have and how you want to hang them!)


Feel free to use whatever paints you already have too to keep costs down!

All in all this project will cost around £6 -£20 (depending on the paint you choose) as I already had the paints, it cost me £5.93!


 Step one - Paint your plaques


If you are using chalk paint like me, you won't need to prime your plaques at all (whoohoo!) just slap the paint on there, I made mine a bit patchy and textured on purpose to make it seem old and spooky. I also mixed more or less water with the paint and did a few coats in areas to get this effect, but feel free to be a neaty-pants if that how you are!


Step two - Spray those bugs!


If your insects have removable wings or other parts that you don't want to spray, remove them first, set your insects on an old piece of cardboard and spray away! Make sure to get the underneath of the insects too!


Allow to dry and stick any wings etc back on.


Step three - Arrange your insects


Figure out how you want to arrange the insects, play around with different shapes and sizes until you get a mix you like, then stick on! I used glue dots to start with but once I hung up the plaques the insects fell off. (Que me jumping at the giant gold spider suddenly hitting the floor :') )


Step four

Hang those bad boys up and admire your creepy crawly creation!


So simple and really cool huh? I just love them, and they aren't too 'out there' so really I could have them out all year round! But I think I'll keep them special for Halloween :)


If you make these for yourself please tag me on Instagram ( @lindzibun)  or feel free to comment and tell me how it went on this post!

Love,
Lindzi


Wednesday 26 October 2016

DIY Halloween Decor - Painted Pumpkins


You will need;


  • PUMPKINS! - this will work on real pumpkins too, but I wanted to be able to keep and reuse mine in future halloweens so I used some polystyrene pumpkins and some paper mache pumpkins in various sizes.

I got most of these from Craftmill and some from a local craftshop. I was really pleased with the quality and price of these from craftmill and the delivery was pretty speedy too.

  • Paints -  whatever colours you like or whatever you have around, however I recommend using a mix of chalk paints (explained below) and metallic paints. Also see my note about spray paint below!


  • Paint brushes
  • A palette or something to mix paint on
  • Old cardboard/ cloth to protect your surfaces


Step one - Pick your paints!


One of the best things about this DIY is that you can paint the pumpkins ANY COLOUR YOU LIKE! I like orange pumpkins, but I LOVE white pumpkins, and we don't really see real ones much in Europe, so this was the main colour I wanted - white with gold accents. I also wanted to keep them a little traditional so I added a couple of orangey/ copper ones and of course a couple of pure gold ones!


Step two - Get painting! 


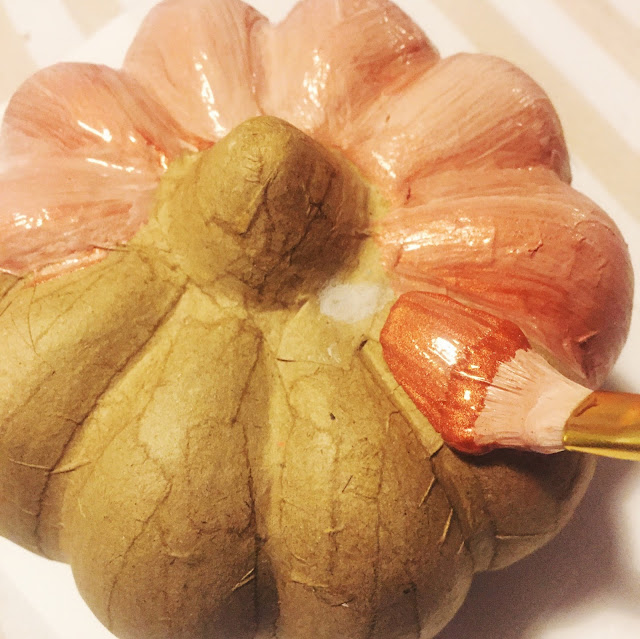
I already had all these paints, and I would 100% recommend using chalk paint for this DIY if you have some lying around, this meant that even though some of my pumpkins were polystyrene the paint pretty much went straight on, I did a couple of coats anyway for the effect I wanted, but one fairly watered down coat light coloured covered the pumpkin for starters!

I mixed the gold and copper paints with some peach or cream chalk paint too, to get different shades and textures. Basically just play around with paints and have fun!


WORD OF WARNING: SPRAY PAINT ERODES POLYSTYRENE!


Did you know this?? I did not ! Until I added a little spray of gold to the top of a couple of the already chalk painted polystyrene pumpkins and suddenly they started to melt! Luckily in this case the chalk paint stopped it totally ruining them and I think it actually added to the affect somewhat - but be careful!


As you can see I was doing this DIY at the same time as the DIY Faux Insect Taxidermy one!


Step four; display!


Depending on the sizes and shapes of pumpkins you've collected, your display could look anyway you like; one rule: pile those pumpkins up!


Here is my mantel before; lots of plants (some real some not) mercury glass, candles and a few quirky bits and bobs.
Also- my framed REAL flamingo feathers I collected in Barcelona Zoo!


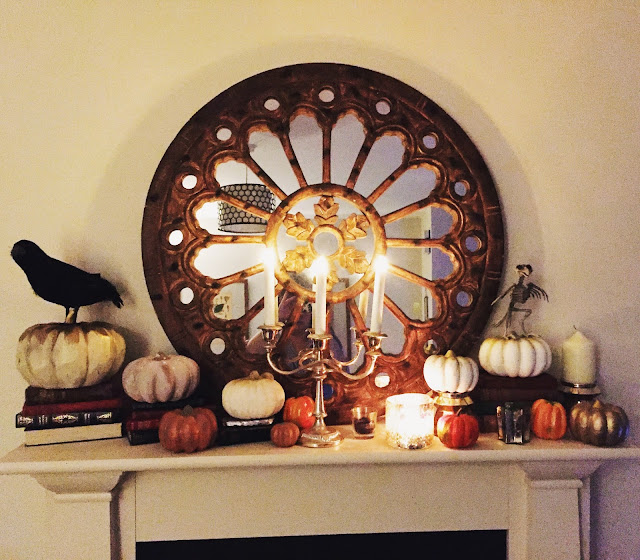
This is between- me trying to figure out how I wanted the pumpkins to look, I set them all up there and I was a bit dissapointed to be honest! I'd expected more of a WOW factor, and they all seemed quite flat! ...my solution?? BOOKS.


I have tons of cool old books, I collected them before my wedding thinking I might use them to display pots of flowers on on the tables but never got round to that. There are at least 3 different vintage copies of Alice in Wonderland there!


So I piled the books high, and popped the pumpkins on and added an antique candlestick, some (fake) candles and a couple of faux crows... and I LOVE how it turned out!

What do you think?


If you make these for yourself please tag me on instagram ( @lindzibun)  or feel free to comment and tell me how it went on this post!


Love,
Lindzi x